This is default featured slide 1 title

Go to Blogger edit html and find these sentences.Now replace these sentences with your own descriptions.

This is default featured slide 2 title

Go to Blogger edit html and find these sentences.Now replace these sentences with your own descriptions.

This is default featured slide 3 title

Go to Blogger edit html and find these sentences.Now replace these sentences with your own descriptions.

This is default featured slide 4 title

Go to Blogger edit html and find these sentences.Now replace these sentences with your own descriptions.

This is default featured slide 5 title

Go to Blogger edit html and find these sentences.Now replace these sentences with your own descriptions.

Showing posts with label Tips Tricks. Show all posts

Saturday, January 19, 2013

নেট প্যাড ব্যবহার কারিদের জন্য USB / পেন ড্রাইভ কে উইন্ডোজ বানানর সহজ উপায়।

যারা নেটপ্যাড ব্যবহার করেন তাদের উইন্ডোজ ডিভিডি থেকে উইন্ডোজ ইন্সটল করা সম্ভভ হয় না । তাদের উইন্ডোজ ইন্সটল করার জন্য পেন ড্রাইভ কে বুটএবেল উইন্ডোজ এ পরিনত করে তার পর উইন্ডোজ ইন্সটল করতে হয় । আমি অনেক ভাবে ট্রাই করে ও Success হয়নি । শেষে গতকাল একটা ব্লগ থেকে সঠিক টুটরিয়াল দেখে সফল হলাম এবং আমার ব্লগ এ সহজ করে টুটরিয়াল টি প্রকাশ করলাম । জানি না আগে এই ভাবে এই TUNE টি প্রকাশ হয়েছে কিনা । যদি কেউ TUNE করে থাকে তবে কমেন্ট করে জানান আমি ডিলিট করে দেব ।
পেন ড্রাইভ কে বুট আবেল উইন্ডোজ বানাতে গেলে আপনাকে প্রথমে উইন্ডোজ এর .iso বানাতে হবে । .iso বানানো যায় অনেক গুলো সফটওয়্যার ব্যবহার করে । তবে আমি  IMGBURN ব্যবহার করি । imgburn ডাউনলোড করুন এখান থেকে ।
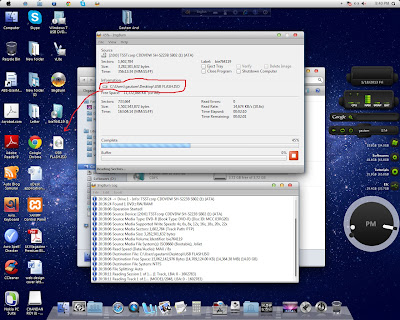
ডাউনলোড করা শেষ হলে ইন্সটল করুন । ইন্সটল করা শেষ হলে উইন্ডোজ এর ডিভিডি কম্পুটার এ প্রবেশ করান । এবার imgburn ওপেন করুন এবং যেখানে আপনি সেভ করতে চান সেই ফোল্ডার বা ড্রাইভ সিলেক্ট করে দিন । নীচের ছবিটি লক্ষ্য করুন ---


কয়েক মিনিট এর ভিতর আপনার .iso হয়ে যাবে ।
এবার আসি ২য় স্টেপ এ, আপনার পিসি তে যদি মাইক্রোসফট এর .NET Framework ইন্সটল করা না থাকে তবে মাইক্রোসফট স্টোর থেকে ডাউনলোড করে ইন্সটল করে নিন। আপনি যদি না বুজতে পারেন যে .NET Framework ইন্সটল করা আছে কিনা তাহলে আপনি Contraol Panel -> Programmes and Features এ যান এবং চেক করে দেখেন ইন্সটল আছে কিনা ।
এবার windows 7 USB/DVD Dowload Tools  ডাউনলোড করুন এবং ইন্সটল করুন । ইন্সটল করা শেষ হলে ওপেন করে .iso ফাইল সিলেক্ট করে পরবর্তী সহজ ধাপ গুলো সম্পন্ন করুন ।


ব্যাস, আপনার Bootable উইন্ডোজ বানানো শেষ ।

How to install windows from Flash Drive/Pendrive ?


How to create a bootable Flash/Pen Drive?
If you are using NETPAD then it is very not possible to install windows from any windows DVD or CD as NETPAD has no CD or DVD ROM. To install windows in NETPAD you  need a FLASH / PEN DRIVE and have to make it BOOTABLE WINDOWS. I am describing here the total procedure.
Essestial things :

a. A 4 GB FLASH / PEN DRIVE.
b. Windows 7/8 DVD 
c. .NET Framework installed in computer.
d. Imageburn software
e. Windows 7 USB or DVD download Tool
If you want to create Bootable Flash Drive then you need to follow the below steps. First, i ask you to install .NET Framework in your computer, download it from here.
Later download "IMGBURN" and " WINDOWS 7 USB OR DVD DOWLOAD TOOLS.
I think that you have download and installed it in your computer. Now we have to do it in two steps ----
First Step:       Create an .iso file of windows 7 or 8 and 
Second Step:   Burn the .iso file 
Create an .iso file of windows 7 or 8

Eject the CD or DVD ROM and enter windows 7/8 DVD in it and run "imagburn" software. Show the drive where you want to save the .iso file of windows. Below i have attached an image, follow it.
After a few minutes your .iso file will created. So the first phase of your work is now complete. Next come to the next phase. Run "windows 7 DVD or USB download Tool from the start menu bar of your computer and follow few steps and it will takes few minutes to create Bootable Flash Drive.

Tuesday, November 13, 2012

Tips & Tricks

ফ্রী আনলিমিটেড ইন্টারনেট ব্যবহার করুন ফ্রি ভিপিএন দিয়ে (গ্রামীনফোন, এয়ারটেল, বাংলালিংক ও রবি, বাংলালায়ন, কিউবি সহ সকল অপারেটর)

প্রথমেই বলে নিচ্ছি আমি আমি ইচ্ছে করেই এই ফ্রী ইন্টারনেট নিজে ব্যবহার করি না শুধু মাত্র আপনাদের জন্য পোস্টটি করলাম। এই পদ্ধতিতে গ্রামীনফোন, এয়ারটেল, বাংলালিং, রবি এবং টেলিটক সহ আরও বাংলালায়ন, কিউবি তেও ফ্রী ইন্টারনেট চালানো যাবে। এই ফাঁকে আরও একটি কাজ আপনাকে করতে হবে। আপনার মোবাইলে ইন্টারনেট চালানোর জন্য যে কোন একটি প্যাকেজ চালু করে নিন। সব থেকে কম দামী এবং ছোট কোন প্যাকেজ হলেও চলবে। প্যাকেজ যতদিন আপনার আনলিমিটেড লাইন তত দিন থাকবে।
আমি দুটি পদ্ধতি বর্ননা করলামঃ

প্রথম পদ্ধতি

আমি আপনাদের কে পদ্ধতিটি ধাবে ধাবে বর্ননা করবো। খুবই মনোযোগ দিয়ে দেখবেন। প্রথমে যে সফটওয়্যারটি আমাদের দরকার হবে সেটি ডাউনলোড করে নিন এখান থেকে  (যদিও এটার কোন কাজ নেই)।
আপনি যদি উইন্ডোজ সেভেন বা এইট ব্যবহারকারী হয়ে থাকেন তা হলে আপনাকে অতিরিক্ত আরও একটি কাজ করতে হবে। প্রথমে আপনার কম্পিউটারে যেখানে উপরের সফটওয়্যারটি ইন্সটল হয়েছে সেই ফোল্ডারে যান। যদি আপনার উইন্ডোজ C ড্রাইভে থাকে তা হলে এই লোকেশানে যানঃ C:\Program Files\proXPN\bin
ঐ bin ফোল্ডারের মধ্যে দুটি ফাইলে একটু কাজ করতে হবে। openvpn.exe ও  proxpn.exe নামের দুটি ফাইলের উপর রাইট ক্লিক করুন তারপর Compartiblity ট্যাব এ যান এবং নিচে Privilege level এর অধিনে Run this program as an administrator এ একটি টিক দিয়ে Ok করুন।
এবার আর একটি কাজ বাকি আছে। এখান থেকে ডাউনলোড করে নিন ফাইল গুলো। তারপর তা আনজিপ করে যে কোন জায়গায় রাখুন। ঐ ওটার মধ্যে দেখুন vpnbook-udp53.ovpn নামের একটি ফাইল আছে ওটাতে রাইট বাটন ক্লিক করে Start proXPN on this config file এ ক্লিক করুন। তারপর ডস প্রমট বা কমান্ড প্রমট এর মতন একটি উইন্ডো চালু হবে। সেখানে আপনাকে ছোট্ট একটি জিনিস লিখতে হবে। ওখানে দেখবেন ইউজারনেম এবং পাসওয়ার্ড চাইবে। নিচের ইউজারনেমটি কপি করে ওখানে রাইট ক্লিক করে পেস্ট করে দিন। তারপর Enter চাপুন। ঠিক একই ভাবে পাসওয়ার্ডটিও দিবেন তবে পাসওয়ার্ড কপি করে দিলে কিছু দেখা যাবে না তারপরেও আপনি একবার পেস্ট করে দিবেন।

Username: freeopenvpn
Password: J8hfCiu6W
আপনার কাজ প্রাই শেষ, পাসওয়ার্ড দেওয়ার পর Enter চাপুন তারপর কিছুক্ষন অপেক্ষা করার পর দেখুন নিচের ছবির মতন কিছু একটা এসেছে কিনা। Initialization Sequence Compeleted এই লেখাটি আসার মানে হচ্ছে আপনার কাজটি সফলভাবে সম্পন্ন হয়েছে।

এবার আপনি ফ্রী ইন্টারনেট উপভোগ করুন।
তবে যদি কখনো কাজ না করে তার জন্য আমি দায়ী নই, কারন যে কোন মুহুর্তে যে কোন মোবাইল অপারেটর এটি বন্ধ করে দিতে পারে।  এই পদ্ধতি বন্ধ হলে নতুন পদ্ধতি বের হবে। আর নতুন কিছু পেলেই আপনাদের কে জানিয়ে দেওয়া হবে।
এই মুহুর্তে জানতে পারলাম এটা কিউবি এবং বাংলালায়নে নাও কাজ করতে পারে কারন তারা UDP Port 53 ব্লক করে দিয়েছে।

দ্বিতীয় পদ্ধতিঃ

১। প্রথমে এখান থেকে সফটওয়্যারটি ডাউনলোড করে ইন্সটল করুন। দেখবেন আপনার কম্পিউটারের স্ক্রীন এর নিচের ডান পাশের অংশে অর্থাৎ সিস্টেম ট্রে তে নতুন একটি আইকন দেখা যাচ্ছে। OpnVPN এর। অখানেই আমাদের কাজ।
২। যদি উইন্ডোজ ৭/৮ ব্যবহারকারী হয়ে থাকেন তা হলে আপনাকে অতিরিক্ত আরও একটি কাজ করতে হবে। প্রথমে আপনার কম্পিউটারে যেখানে উপরের সফটওয়্যারটি ইন্সটল হয়েছে সেই ফোল্ডারে যান। যদি আপনার উইন্ডোজ C ড্রাইভে থাকে তা হলে এই লোকেশানে যানঃ C:\Program Files\OpenVPN\bin
ঐ bin ফোল্ডারের মধ্যে দুটি ফাইলে একটু কাজ করতে হবে। openvpn.exe ,  proxpn.exe ও  openvpn-gui.exe নামের ৩টি ফাইলের উপর রাইট ক্লিক করুন তারপর Compartiblity ট্যাব এ যান এবং নিচে Privilege level এর অধিনে Run this program as an administrator এ একটি টিক দিয়ে Ok করুন। প্রত্যেকটি ফাইল এর জন্যেই আলাদাভাবে এই কাজ করতে পারেন। এটার মানে হচ্ছে Administrator অনুমতি দেওয়া হল।
৩। এখান থেকে ফাইলটি ডাউনলোড করে আনজিপ বা এক্সট্র্যাক্ট করুন যে কোন ফোল্ডারে তারপর তার মধ্যে vpnbook.crt ও vpnbook-udp53.ovpn নামের দুটী ফাইল আছে ঐ দুটি ফাইল কপি করে যেখানে পুর্বের সফটওয়্যারটি ইন্সটল হয়েছে অর্থাৎ  C:\Program Files\OpenVPN\config ফোল্ডারের মধ্যে ফাইল দুটি পেস্ট করুন। কাজ শেষ এবার ১ নম্বর ধাপে য সফটওয়্যারটি ইন্সটল করেছিলেন টার আইকন দেখুন নিচে টাস্কবারের ডান পাশে দেখা যাচ্ছে। ওখানে রাইট ক্লিক করে Connect এ ক্লিক করুন। তারপর Username ও Password চাইবে।
Username: freeopenvpn
Password: J8hfCiu6W
উপরেরটা বসিয়ে দিলেই কাজ হয়ে যাবে। কিছুক্ষনের মধ্যেই দেখবেন কানেক্ট হয়ে যাবে। তারপর দেখবেন কাজ হছে। এটাতে স্পীড ভালো পাবেন এবং ব্লক হওয়া সাইট গুলোতেও এখন ঢোকা যাবে। যেমনঃ ইউটিউব।
তবে যদি কখনো কাজ না করে তার জন্য আমি দায়ী নই, কারন যে কোন মুহুর্তে যে কোন মোবাইল অপারেটর এটি বন্ধ করে দিতে পারে।  এই পদ্ধতি বন্ধ হলে নতুন পদ্ধতি বের হবে। আর নতুন কিছু পেলেই আপনাদের কে জানিয়ে দেওয়া হবে। অনুগ্রহপুর্বক https://www.facebook.com Headphn-r-relationship এখানে একটি লাইক দিয়ে রাখুন তা হলে আপডেট কিছু পেলে আপনারা জানতে পারবেন।

Tips & Tricks

                 Torrent Files Download করুন IDM দিয়ে।

প্রথমে আপনি আপনার পছন্দের  torrent টি নামিয়ে নিন।
এবার এটা আপনার PC তে SAVE করে নিন।


তারপর চলে যান http://www.zbigz.com


এখানে গিয়ে upload torrent ক্লিক করে আপনার torrent file টি দেখিয়ে দিন ।তারপর GO চাপুন।
এখন শুরু হবে caching torrent
এইটা complete হতে ১ থকে ২ মিনিট লাগে।কখনো বেশিও লাগতে পারে


এরপর zip এ ক্লিক করে ।DOWNLOAD option আসলে ওইটাতে ক্লিক করুন ।
বেস হয়ে গেলো।

Tips & Tricks

How To Get Mobile Number Details

Hello guys, today i am going to tell you about a simple trick which will help you to get full details of any mobile number. Many people search for “How to get full details of any mobile number” or “How to get mobile number details” on Google. I have already posted this post a long time ago, but as my server changed i lost all the posts. By seeing the popularity of my this post, i am going to post this once again. Really i was getting many visitors who wants to get details of a mobile number. After reading my post they got the way to find it. If you are very new to my website i am going to explain the whole trick to you. The trick is very simple and i am pretty sure that you will get the details of almost every mobile. This trick depends on an online directory in which all mobile number information is saved.

What Is Needed ?

For this trick to work you only need to download a simple application known as TrueCaller on your phone and you need a working internet connection, as it only works when internet is enabled as it search for online directory. Just go to this page to download TrueCaller.

Platform Supported

  1. Android
  2. Apple iPhone
  3. Nokia Symbian
  4. Blackberry
  5. Windows

Steps

1.) Download TrueCaller and install it on your phone.
2.) Now open the installed application. It will look like the following image.


3.) Now click on Next and a screen will appear as following image.


4.) Now click on Change Country and a popup with all country names will come.


5.) Now click on India to set your Country as India. If you are outside India then select the appropriate country.


6.) Now next step is to click on Next. A Screen with Go to Social button will come.


7.) If you wanna link your Facebook or LinkedIn account with this application to see your friends latest status message and profile pictures on incoming and outgoing calls then you can, otherwise there is no compulsion to do this step, you can easily skip it by clicking on Finish button. After you click Finish button a screen will come that will tell you about TrueCaller.


8.) Wait for 2-3 Seconds on this screen and after that you will get a screen like following image, showing latest news regarding TrueCaller.


9.) Now just click on Cross at the top-right and you will be able to see the TrueCaller menu.


10.) Click on the icon at the Bottom-Right to open up the settings. Just scroll until you see the menu same as the image.


11.) Now make sure that the check boxes in front of Enable Smart Directory  Assistance and Remember my choice are checked. Small Directory Assistance will help to find the mobile number details more deeply, so that you can get maximum and correct results. Now if they are checked just exit Settings by just clicking back button and you will be headed toward the previous menu that looks like the following image.


12.) Now just click on Search & History. A screen will come where you have to enter the number you want to get detail of.


13.) Now click on Search and it will start looking up for that number on internet directory.


14.) After sometime it will show you the name of the owner of that number. In India it will only show you the name of owner. If you are in country like USA, then it will also show owner address along with the owner name.


15.) If you want more information regarding the number just click on arrow > in the search result. A you will be taken to a screen with all the information about that number.


            This whole Setup is Just for one time. After that you will be directly land on Search and History page.

Features

  1. Get full details of any mobile number.
  2. You can add new contact directly from application with their name found by TrueCaller.
  3. You can share the details of any number.
  4. If you are in USA, you can get address of caller and thus you can show that on map.
  5. If you are using 3G then it will search for the number details and display on screen when you receive or make any call.
  6. In 2g it will display the details but after call get disconnected.

Limitations

It is one of the best applications ever developed, that make life of a mobile user very comfortable. As user can find each and every detail of owner of mobile number easily with only one click.
  1.  New numbers are not there in this application. That take time to get updated.
  2. Indian address details not available.
Sometimes while going through first time process, you may get an option to enable Enhanced Search. Just enable it, to look for results more deeply.
So just use this application and share your reviews in form of comments with me. If you are having any type of problem or having any question, then comment below, i will try my level best to reply you as soon as possible.

Saturday, November 10, 2012

Changing Language With Vlc Media Player

How To Play Dual Language Video File/Swithing Audio

Changing Language With Vlc Media Player


Step 1 - To Play Dual Audio File You Need Vlc Media Player Download It From Here
Step 2 - Play The Video Using VLC Media Player
Step 3 - Go To Audio On The Top
Step 4 - Audio>Audio Track>Track 1 Or Track 2


Changing Language Using Media Player Classic

Step 1 - To Play Dual Audio File You Need Media Player Classic.
Get Media player Classic free from here. [Password - www.world4free.in]
Step 2 - Open Video File With Media Player Classic.
Step 3 - Then Right Click on video window then go to>Navigate>Audio Language>Then Select The Language You Want To Listen..

Tuesday, October 30, 2012

Tips & Tricks

                      How To Join Files using HJSPLIT


Mediafire has some limitations on the size of the uploaded files. This is why; you come across files that are uploaded in parts. These files have the extensions .001, .002, .003, and so on and need to be joined first. Download HJ Split : Click Here

HJSplit does not need to be installed: you can directly run HJSplit by double-clicking HJSplit.exe. Locate the group of files that all have the same file name, except for the extension at the end of the file. The extensions begin with ".001" and continue ".002," "003" and so on. Make sure you have all the files needed to join. If one is missing, you will not be able to complete the process. The files should all be in the same directory.